Think it can't be saved? Think again!
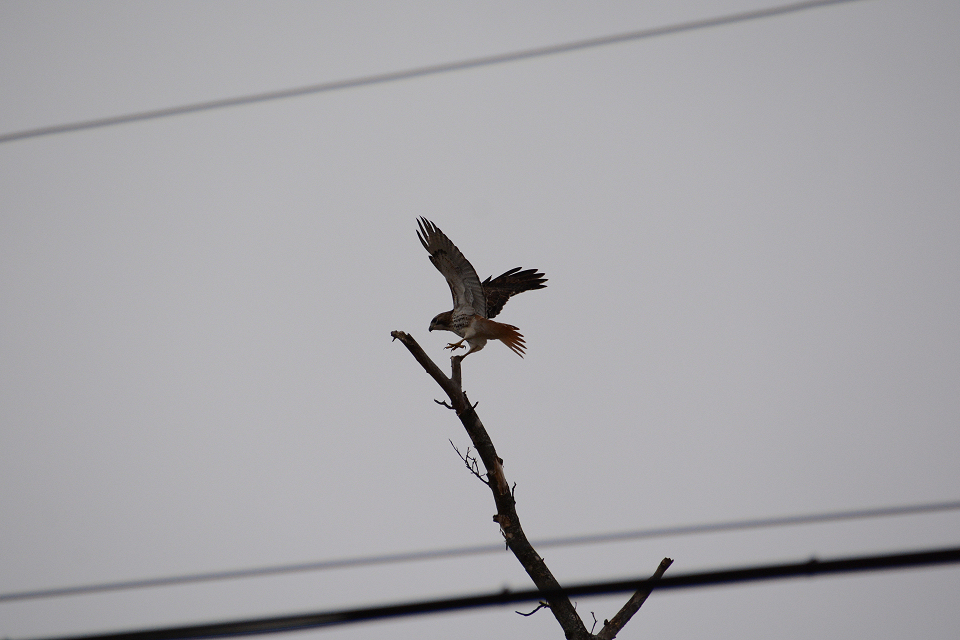
When I was learning about using textures, I frequently read statements along the line of "you have to have a good photo to start with"...that using textures won't save a bad photo. I'd like to dispel that myth. I think the only photo which might not be worth saving is a blurry/out of focus photo. A few days ago, we drove out in the country for a while while we were waiting for an appointment time. I didn't have my big lens (the Sigma 150-500mm) I shoot birds with...I only had a 250mm length on the lens I was using that day. And of course, I see a hawk. A beautiful Red Tailed Hawk on a snag by the road! After getting safely off the road, I slipped out of the car to photograph this gorgeous bird against the dark gray sky. Even with raising my exposure to compensate, I knew these photos would be "iffy". I was too far away, had too small of a lens, and it was too dark. I photographed him anyway, as he danced back and forth from one branch top to the next. It was quite entertaining to watch him! Below is one of the original photos, straight from the camera. I love this photo because of the action in the shot, the fact the bird is clear, and he's sideways so I can see his face. But oh...those wires....oh the dark sky...can I save this one at all?
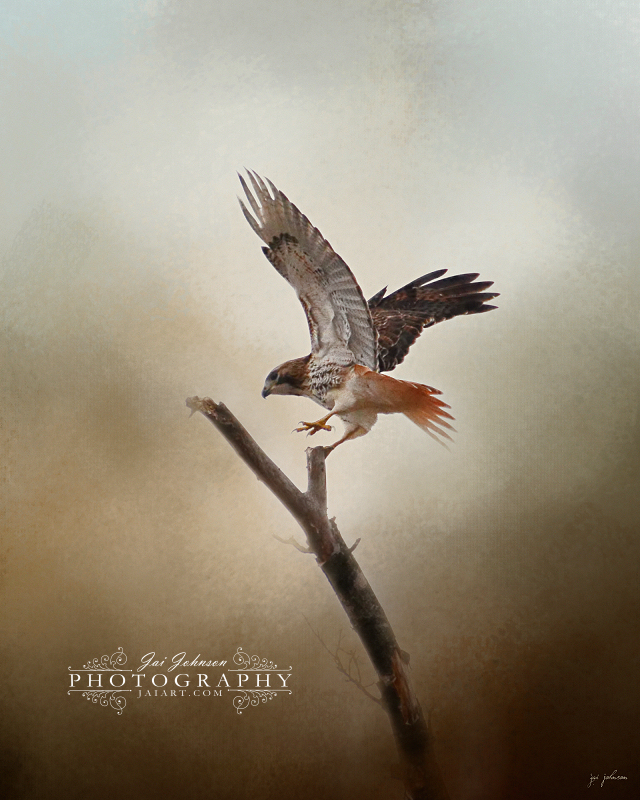
The first thing I did was crop the photo. It was either do that or clone out all those wires. And to be honest, I didn't need all the excess sky around him - I wanted the finished piece to focus on this bird. So I went with a vertical crop. The second thing I did was to brighten things up. I actually made a separate layer in Topaz and made a high key adjustment, which brightens things up, almost like a curves adjustment would in photo software. After I made that adjustment, the sky became white and the bird much brighter. Using Topaz Remask, I masked out the bird and the branch, and placed the Old Masters 2 texture underneath to give him a nice background. Then I duplicated the texture layer and placed it on top of the entire picture. I diffused that layer to give it softness, as I had enough "texture" in the background already. I set that layer on Soft Light and desaturated the layer in order to keep my color level the same as the initial textured background. It wasn't quite bright enough, so I duplicated the Soft Light layer and changed the third duplicated layer to Overlay mode. That did the trick - it put just the right amount of light on the bird. And this is what I ended up with:
So don't toss those "bad" photos, as you never know what you can accomplish later with the use of some textures...they just made turn your photo into a work of art you can be proud of!
 RSS Feed